
How to String a Diamond Kite?
A diamond kite is only as good as its string setup. Even a well-built kite can fly poorly if the bridle or flying line is attached incorrectly. The good news is that most diamond kites use a simple two-point bridle system that takes only a few minutes to assemble once you understand the basics.
Whether you’ve just purchased a kite or you’re restringing an older one, this guide walks through the process step by step.
Understanding the Parts of a Diamond Kite
Before attaching any string, it’s helpful to know the main components.
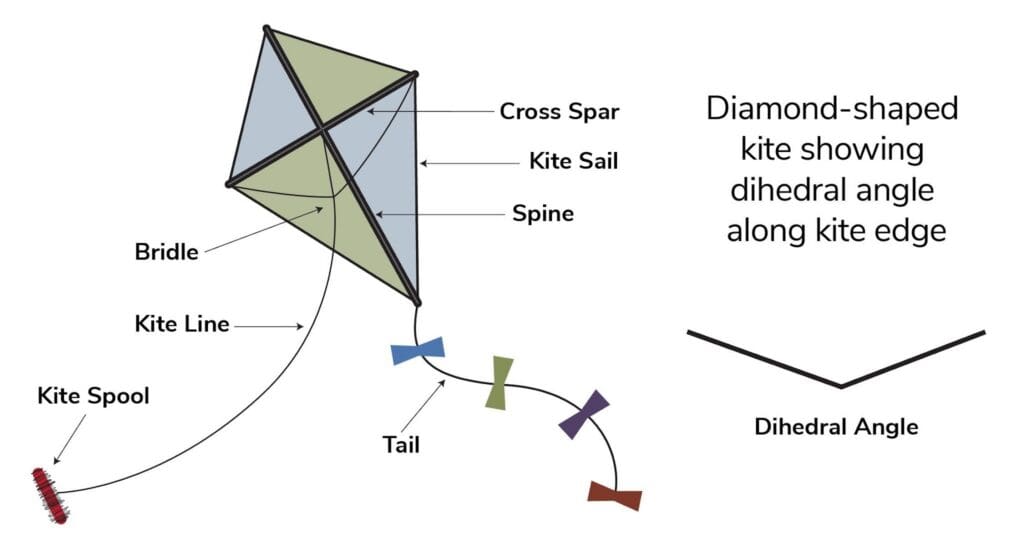
A typical diamond kite includes:
- Vertical spine (top to bottom spar)
- Horizontal cross spar
- Sail material
- Bridle line
- Flying line
- Tail
The bridle is the short string attached directly to the kite. The flying line is the long string that you hold while flying. The two should never be confused because they perform different functions.
Step 1: Locate the Bridle Attachment Points
Most traditional diamond kites use two bridle attachment points along the vertical spine.
One point is located above where the spars cross. The second point is located below the cross point, closer to the tail. The bridle line runs between these two locations and creates the angle that allows the kite to climb into the wind.
Some commercially manufactured kites arrive with the bridle already installed. If yours does, inspect it before flying to ensure it has not become tangled during packaging.
Step 2: Attach the Bridle Line
If the bridle is not already attached, tie one end of the string to the upper attachment point and the other end to the lower attachment point.
The bridle should form a loose line running down the center of the kite’s spine. It should not be pulled tight like a guitar string. A small amount of slack allows the kite to find its proper flying angle.
Many traditional diamond shape kite designs use a two-point bridle because it offers a good balance of stability and simplicity.
Step 3: Find the Tow Point
The tow point is where the flying line connects to the bridle.
This point is usually located somewhere between the two bridle attachment points rather than directly at either end. Moving the tow point slightly up or down can affect how the kite flies.
For most beginners, the factory-recommended position is the best place to start. Once you gain experience, small adjustments can help fine-tune flight performance in different wind conditions.
Step 4: Attach the Flying Line
Now connect the main flying line to the tow point on the bridle.
Many kite enthusiasts use a simple Lark’s Head knot because it is secure and easy to remove when necessary. The knot should be snug enough to stay in place while still allowing adjustments if required.
Take a moment to inspect the connection before flying. A loose knot can quickly end a kite-flying session.
Step 5: Attach the Tail
Many flat diamond kites require a tail for stability.
The tail is typically attached to the bottom point of the kite and helps prevent spinning, wobbling, and excessive side-to-side movement during flight. Traditional diamond kites often fly best with tails several times longer than the height of the kite itself.
If your kite came with a tail, use the supplied attachment point. If it did not, check the manufacturer’s instructions for recommended tail length.
Step 6: Check the Balance
Before heading outside, perform a simple balance test.
Hold the kite by the bridle tow point and allow it to hang freely.
A properly rigged diamond kite should hang with a slight tail-down angle rather than pointing straight up or straight down. This angle helps the kite achieve stable flight once airborne.
If the nose drops dramatically, the tow point may need adjustment.
Common Stringing Mistakes
Many first-time flyers encounter problems because of simple setup errors.
Common mistakes include:
- Attaching the flying line directly to the frame
- Twisting the bridle line
- Connecting to the wrong tow point
- Forgetting the tail
- Using damaged string
- Installing the kite frame backwards
One of the most frequent issues with diamond kites is incorrect assembly of the frame itself, which can dramatically affect flight performance.
How to Tell If Your Kite Is Strung Correctly
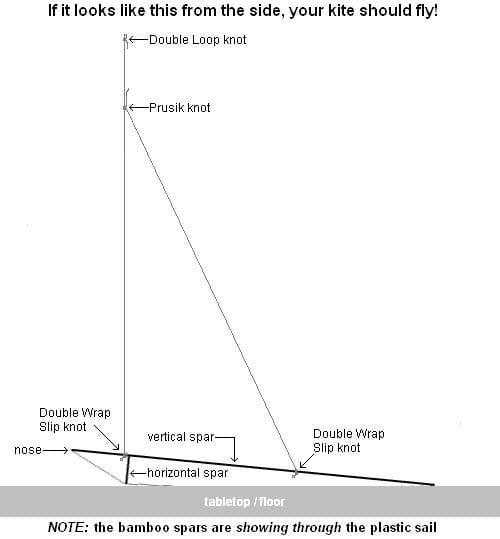
A properly strung diamond kite will usually:
- Launch easily
- Climb steadily
- Remain relatively stable
- Pull evenly on the flying line
- Recover from minor gusts
If the kite spins continuously, dives forward, or refuses to gain altitude, the bridle position, tail length, or assembly may need adjustment.
Small changes often make a big difference.
Best Conditions for Flying a Diamond Kite
Diamond kites generally perform best in light to moderate winds.
Very light winds may not provide enough lift, while strong winds can make the kite unstable or place excessive stress on the frame.
Open fields, beaches, and parks with minimal obstacles are typically ideal locations for launching and flying. Diamond kites have remained popular for generations because they are simple, dependable, and beginner-friendly when properly assembled.
Tips for Better Flights
Once your kite is strung correctly, a few simple habits can improve your experience.
Keep your flying line free of tangles before launch. Inspect knots regularly for wear. Avoid launching near trees, power lines, or buildings. If the kite begins leaning heavily to one side, check that the frame remains symmetrical and that the bridle is centered.
Many flight issues are easier to solve on the ground than while the kite is already in the air.
Also Read: How to Fly a Diamond Kite?
Final Thoughts
Learning how to string a diamond kite is one of the most important skills for successful kite flying. The process is straightforward: attach the bridle to the proper points, connect the flying line to the tow point, secure the tail, and check the balance before launch.
Once properly rigged, a diamond kite can provide stable, enjoyable flights for beginners and experienced flyers alike. A few minutes spent setting up the string correctly can make the difference between a frustrating afternoon and a kite that climbs smoothly into the sky.
Ready for Your Next Flight?
If you’re new to kite flying or looking to expand your collection, Castakite is a trusted kite online shop offering a variety of kites, accessories, and flying resources to help you get the most from every outdoor adventure.
Explore different kite styles, learn new techniques, and discover why kite flying remains one of the most enjoyable outdoor activities for all ages.